Accurately reading a pressure gauge is an essential skill in the industrial sector. This expertise ensures that processes are conducted safely and adhere to high-quality standards.
Did you know that misreading a pressure gauge can lead to serious repercussions, particularly in crucial industries such as pharmaceuticals, food and beverage, and biotechnology?
The potential risks include incorrect chemical reactions, unsafe or inferior quality products, and even serious workplace accidents.
In biotechnology, for instance, misreading a pressure gauge can lead to incorrect pressure conditions in bioreactors, affecting cell growth and product yield. This can result in significant financial losses and production delays.
It’s important to understand that a pressure gauge is not just a tool but a “warning system,” alerting operators to potential dangers caused by excessive pressure. Thus, being able to read a pressure gauge correctly is not just a skill but a vital responsibility. This skill helps prevent production issues and potential hazards and safeguards against serious workplace accidents.
Recognizing the importance of this skill, the Bawalaksana Central Industrial team has compiled essential insights on how to read an industrial pressure gauge effectively and accurately.
By following this guide, you can uphold process integrity while maintaining safety and quality standards. These insights are not just helpful but invaluable in your professional journey.
Here’s a brief overview of what this article covers:
- Functions and types of industrial pressure gauges
- Basics of pressure measurement
- Explanation of pressure units and accuracy classes
- How to select the correct pressure range for your application
- A step-by-step approach to reading a pressure gauge
- Tips for avoiding common reading errors
By grasping these key points, you can achieve precise pressure readings, improve process quality, and avoid significant issues and financial setbacks.

Definition, Function, and Types of Pressure Gauges
A pressure gauge is a device designed to measure the pressure of fluids—whether gas or liquid—within closed systems and pipelines. Its primary purpose is to monitor industrial processes, ensuring that systems function within safe limits to protect product integrity.
Pressure gauges are used in many environments, including process pipelines, pneumatic and hydraulic systems, air brake systems, offshore operations, and more.
Types of Pressure Gauges
In industrial settings, selecting the right pressure gauge is crucial, as each application demands a gauge tailored to the specific fluid being measured. Opting for the correct type ensures accurate and consistent measurements, enhances safety, and prolongs the instrument’s life.
Today, the market offers various pressure gauges, which can be classified in several ways. However, they typically fall into two main categories:
- Process Pressure Gauge: These gauges are essential for critical industries such as pharmaceuticals, petrochemicals, food and beverage, offshore operations, and calibration test gauges.
- Low-Cost Utility Pressure Gauge (OEM): These are designed for non-critical and low-risk applications, such as air compressors, pneumatic systems, HVAC units, and gas cylinders.
For a comprehensive overview of the various types of pressure gauges within each category, please read our article, 9+ Types of Industrial Pressure Gauges and Specifications, which provides in-depth insights into their features and specifications.
How to Choose the Right Industrial Pressure Gauge
As mentioned, each pressure gauge is crafted specifically for industrial use, considering factors like material composition, construction, safety features, accuracy class, dial size, and more.
The first type, the Process Pressure Gauge, incorporates more advanced components than the Low-Cost Utility Gauge. Key distinctions include a higher accuracy class, enhanced safety features, a sturdier casing, and more resilient Bourdon tubes.
While they may look similar in design and function, their differences become apparent when subjected to extreme environmental conditions. Thus, it’s crucial to carefully evaluate essential features when selecting a pressure gauge to ensure reliability in real-world applications. The more demanding the challenges, the higher the reliability standards should be for the gauge.
In summary, opting for a high-quality pressure gauge is a wise investment in asset safety, operator protection, industrial environment sustainability, and process integrity.
For a more in-depth look at the vital components of pressure gauges, look at our article, Basic Anatomy of a Pressure Gauge: Components, Accuracy, and Materials.

Fundamentals of Pressure Measurement
Reading a pressure gauge accurately is a crucial skill that can be mastered by understanding the basic principles of pressure measurement. Fortunately, the Bawalaksana team will delve into these fundamentals in this article.
Pressure measurement is essential in various fields, and there are three key methods to consider:
- Gauge Pressure: This method measures pressure relative to atmospheric pressure (1 BAR), as seen when checking tire inflation.
- Absolute Pressure: Here, pressure measurement is in relation to a perfect vacuum or zero pressure (0 BAR). A typical application is in the oil and gas industry, where precise readings are crucial.
- Differential Pressure: This approach measures the pressure difference between two points, such as the upstream and downstream of a filtration system.
The accompanying diagram highlights the distinctions between gauge pressure and absolute pressure.

In industrial settings, choosing the correct pressure measurement method is vital for obtaining accurate readings relevant to specific operational conditions. Notably, most contemporary pressure gauges are typically calibrated to measure gauge pressure by default.
For those looking to deepen their understanding of pressure measurement methods, we invite you to read our article, Basics of Measurement: Absolute, Gauge, and Differential Pressure.
Pressure Units and Measurement Ranges
Pressure gauges utilize different units to express fluid measurement values, as detailed in the table below:
| Unit | Conversion |
| BAR | 1 BAR = 14.5 PSI |
| MPa | 1 BAR = 0.1 MPa |
| PSI | Standard U.S. pressure unit |
The dial window on a pressure gauge may show two distinct measurement units such as:
- PSI and BAR
- BAR and PSI
- BAR and MPa
- Psi and Kg/cm²
Each pressure gauge has a maximum measurable limit, called the gauge range. Typically, pressure gauges are available with measurement ranges starting from 0 to 1 BAR (0 to 15 PSI) up to 0 to 100 BAR (0 to 1500 PSI).
How to Choose the Right Measurement Range
Selecting a pressure gauge with a suitable range that aligns with the operating pressure is essential to guarantee reliable measurements. A good guideline is to ensure that the operating pressure remains between 25% and 75% of the gauge’s full scale.
For instance, if the operating pressure in an industrial setting is around 50 BAR, you should opt for a pressure gauge with a measurement range from 0 to 100 BAR.
For more precise visualization, refer to the diagram below:

Regardless of the operating pressure, strive to keep the gauge pointer within the measurement range’s “sweet spot,” ideally below 75% of the full scale.
This practice helps prevent deviation or damage from excessive pressure spikes, ensuring the instrument is durable and consistently accurate.
Accuracy Class
A high-quality pressure gauge must adhere to internationally recognized accuracy standards, like EN 837-1. Here are some typical accuracy classes you might encounter for instruments such as Process Pressure Gauges:
- EN 837 Class 0.25: This class indicates a maximum error of ±0.25% of the pressure range, making it highly accurate.
- EN 837 Class 0.6: Slightly less precise than Class 0.25, but still offers reliable measurements suitable for many applications.
- EN 837 Class 1.0: This class allows for a maximum error of ±1% of the pressure range, indicating a broader error margin than the classes above.
The lower the accuracy class value, the smaller the measurement deviation or error. Thus, a pressure gauge with an EN 837 Class 0.25 is more reliable than one with an EN 837 Class 1.0.

How to Determine the Accuracy Class of a Pressure Gauge
To identify the accuracy class, take a close look at the gauge’s dial face. You’ll typically find the relevant marking in the bottom right or center of the dial. Look for labels such as:
- Acc
- Class
- Cl or Kl (e.g., Cl 1.0 indicates a 1% accuracy of the full scale)
It’s important to note that even the most accurate pressure gauges can show deviations (errors) over time and with continuous use. That’s why calibrating a pressure gauge is a routine task that should be carried out for all types of pressure gauges.
Some of the key benefits of calibration in industrial settings include:
- Enhanced process efficiency
- Guaranteed product integrity
- Increased customer satisfaction
- Avoidance of penalties and compliance issues
Ideally, calibration should occur at least once a year or every three months for sectors where precision is critical.
For more insights into the significance of pressure gauge calibration, see our comprehensive guide, Critical Facts About Pressure Gauge Calibration You Need to Know.

Guide to Accurately Reading a Pressure Gauge
Now that you understand the basics of pressure measurement let’s examine how to read a pressure gauge accurately in real-world situations.
Pre-Measurement Checklist
Before you check the pressure gauge, keep these essential points in mind:
- Ensure the pointer rests on zero (0) before taking any measurements.
- Based on the expected pressure value, please choose the proper measurement range and ensure it stays below 75% of the maximum scale range.
- Check the unit of measurement displayed on the gauge—whether it’s BAR, PSI, or MPa—and document it accurately under international standards.
- Confirm the pressure gauge’s accuracy class to ensure it meets recognized standards, such as EN 837 Class 0.25, Class 0.5, or Class 1.0.
- If the gauge dial shows two different units (like BAR and PSI), read the scale corresponding to your required measurement.
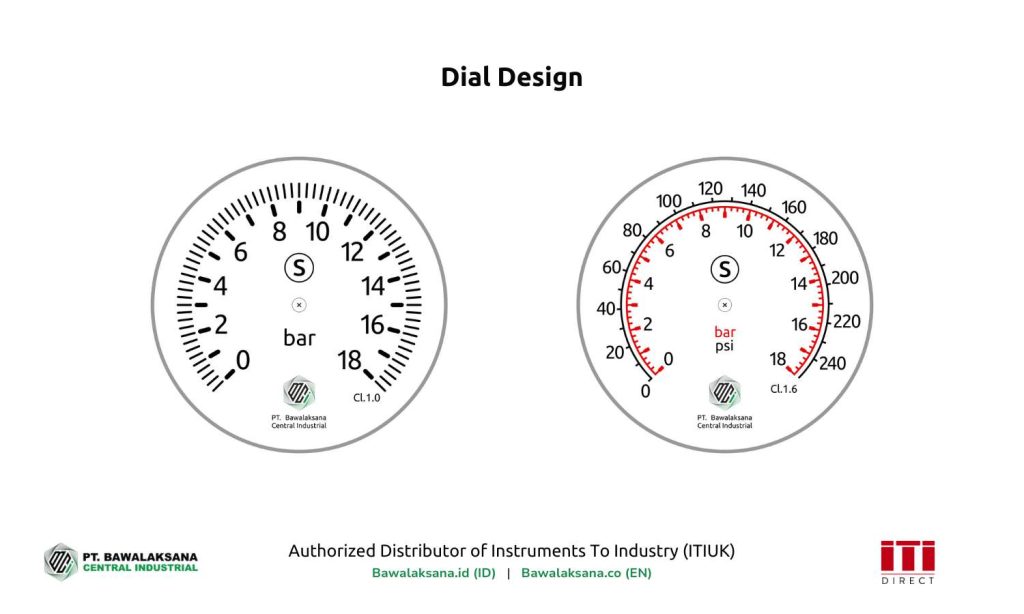
For instance, in the image above, the dial face on the right displays two different units of measurement: BAR and PSI.
The red markings indicate the BAR readings, while the black markings represent the PSI readings.
Reading Measurements from a Parallel Angle
When checking a pressure gauge, it’s important to have your eye level directly in line with the dial face—looking from the side or above can lead to inaccuracies. This alignment ensures that the reading the pointer indicates is as precise as possible.
Take note of the value shown by the pointer according to the relevant scale or unit of measurement. Once you’ve accurately recorded the pressure reading, make sure to jot it down in your documentation.
In some situations, vibrations can make reading the measurement tricky. Consider using a pressure gauge filled with glycerin or silicone oil to avoid this issue. These fluids help stabilize the pointer and reduce oscillations, allowing for a more reliable reading.
Reading the Scale Markings on a Pressure Gauge
When the pressure gauge pointer doesn’t align perfectly with a number or mark, you can still make an educated guess about the measurement based on the scale.
For instance, if the gauge ranges from 0 to 250 BAR and has an accuracy class 1.6, you can determine that each small marking represents 10 BAR. If the pointer falls between two marks, you can estimate the value to be around ±5 BAR.
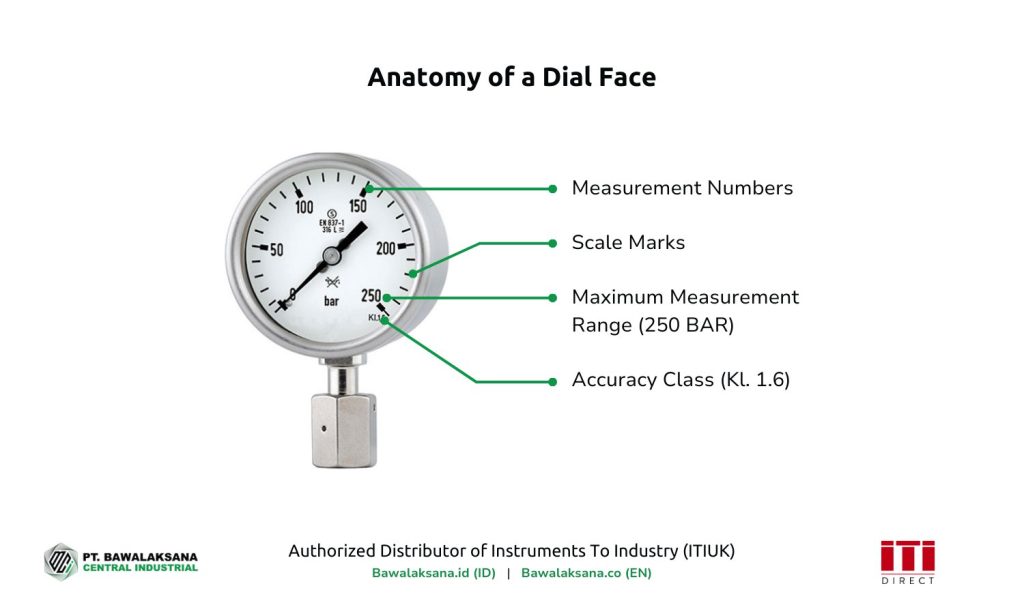
To enhance measurement accuracy and precision, opt for a pressure gauge with finer scale markings. Gauges with more prominent dial faces, such as those with a diameter of 250mm, typically boast an accuracy class of 0.25, providing greater detail for readings.
When selecting a pressure gauge, it is crucial to consider the specific requirements of your industrial application. A good rule of thumb is to choose a dial size that allows for easy readability from a comfortable distance once the gauge is installed. It ensures effective monitoring and operation within your system.
Tips to Avoid Reading Errors
When reading a pressure gauge in an industrial setting, you face several challenges that could hinder accurate measurements. Factors like vibrations, excessive pressure, or varying environmental conditions can all impact the readings.
Here are some essential tips to help you achieve precise pressure gauge readings in various scenarios:
- Select a pressure gauge with the right accuracy class for your needs. Aim for an accuracy class between 0.1 and 0.25 if precision is crucial for your industrial process.
- Choose an appropriately sized dial to ensure you can read it clearly from a comfortable distance.
- Always read the gauge from a direct, front-facing angle to eliminate parallax errors, which can lead to inaccurate readings.
- To avoid misinterpretation, familiarize yourself with the measurement units (BAR/PSI/MPa) and understand the pressure gauge’s full-scale range.
- Ensure the operating pressure does not exceed 75% of the gauge’s full-scale range. If it does, consider switching to a more suitable unit for better measurement reliability and consistency.
- Regularly calibrate your pressure gauge, ideally at least once a year, following international standards for accuracy.
- Use a glycerin—or silicone-filled gauge to reduce the impact of vibrations. This helps stabilize the pointer and minimize oscillation, prolonging the instrument’s life.
- Keep the pressure gauge upright to avoid gravity’s deflection of the Bourdon tube, ensuring truly accurate measurements.
Choose a High-Quality Pressure Gauge
When selecting a pressure gauge, choosing one of high quality from a trusted manufacturer is essential. Opting for a top-notch pressure gauge provides reliable support and ensures that your measurements are accurate and consistent.
Additionally, the pressure gauge must be regularly calibrated. This practice upholds the integrity of the product and ensures compliance with industry standards, helping you avoid potential penalties.
Final Thoughts
In the industrial sector, measuring pressure is vital for ensuring operational safety and product quality. A key question arises: how can you correctly use a pressure gauge to obtain accurate measurements?
To effectively use a pressure gauge in an industrial environment, one must possess the right skills and employ suitable measuring instruments. Improper use or selecting the wrong type of pressure gauge can result in significantly erroneous readings.
Before measuring the pressure of a fluid, consider these critical factors:
- Type of Fluid: Identify whether the fluid is corrosive, highly viscous, or a slurry, as this will influence the choice of gauge.
- Fluid Pressure Level: Adjust the measurement range on your gauge accordingly, ensuring that the operating pressure does not exceed 75% of the gauge’s maximum capacity.
- Accuracy Class: For critical measurements, it’s crucial to use a pressure gauge with a high accuracy class to guarantee precise and reliable readings.
- Environmental Factors: Various challenges, such as vibrations, extreme temperatures, or deep-sea conditions, can impact industrial pressure measurements. Take proactive steps to protect the pressure gauge from potential damage.
By carefully weighing these factors when selecting a pressure gauge, you can achieve accurate and consistent measurements that enhance safety and quality in your operations.
In conclusion, our comprehensive guide on accurately reading pressure gauges is essential for ensuring smooth and efficient production processes. Pressure gauges are crucial instruments that play a key role in monitoring systems.
Selecting a high-quality pressure gauge is vital, as it leads to precise readings, enhances overall process quality, improves safety in industrial settings, and increases production efficiency.
PT. Bawalaksana Central Industrial proudly serves as the Authorized Distributor for Instruments To Industry (ITI) from the United Kingdom. ITI has over 150 years of experience (established in 1867) in manufacturing top-notch instrumentation equipment.
If you’re on the hunt for high-quality, precise pressure gauges—be they analog or digital—we wholeheartedly recommend ITI products. You’ll find a broad selection of process pressure gauges suitable for an array of industries, including:
- Petrochemical
- Offshore
- Oil & Gas
- Food & Beverage
- Semiconductor
- Pneumatics
- Hydraulics
- Calibration
- Rail industry, among others.
Additionally, we offer a range of essential industrial process instrumentation, such as:
- Dial thermometers
- Digital thermometers
- Chemical seals
- e-Gauges
- Temperature sensors
- Other specialized instruments
There’s no denying that ITI products are celebrated worldwide for their exceptional quality, and ITI stands as one of the oldest manufacturers of industrial instrumentation equipment.
Choosing the correct pressure gauge for your industrial needs can seem daunting. That’s why our expert engineers are here to help you find the most suitable option for your application. The dedicated team at Bawalaksana Central Industrial is ready to assist you in making the best choice, ensuring your industrial processes run smoothly and effectively.
Don’t hesitate to click the Free Consultation button below to discover the right solution for your business.

Romanta Pinrih Linuwih
Pneumatic Automation Systems Expert
This article was written in collaboration with Romanta Pinrih Linuwih, an expert in Pneumatic Automation Systems, to ensure accuracy and high quality insights.


![10+ Examples of Pneumatic Tools in Daily Life and Industry [2025]](https://bawalaksana.co/wp-content/uploads/2025/05/Sandblasting-large-diameter-pipes-to-remove-surface-contaminants-1080x675.jpg)
