Pressure gauges are vital instruments for measuring fluid pressure in pipelines, alerting industrial operators to critical and potentially hazardous pressure fluctuations.
Despite their critical role in safety, pressure gauges also significantly contribute to the efficiency of industrial processes. Many individuals need to pay more attention to the importance of pressure measurement, which remains a vital undertaking. Pressure monitoring is essential for ensuring smooth and efficient production processes, empowering operators to manage their tasks more efficiently.
Have you ever contemplated the reasons behind the notable price discrepancies among seemingly similar pressure gauges? Alternatively, do you believe that all pressure gauges are fundamentally alike regarding their materials and components?
This article seeks to elucidate critical facts regarding the anatomy of pressure gauges that industry professionals should comprehend. By understanding the variations in materials, design, and manufacturing processes, professionals can make informed decisions that directly influence the quality and performance of a pressure gauge, thereby enhancing their knowledge and expertise in the field.
These differences contribute to substantial price variations—even among products that may appear similar—along with durability and service life distinctions.
What is a Pressure Gauge?
A pressure gauge is an instrument for measuring fluid pressure. It can be used to measure gases and liquids in various settings, including industrial environments and residential use.
The primary function of a pressure gauge is to facilitate the monitoring and maintenance of fluid pressure within designated safe limits. This practice is essential for companies to mitigate potential hazards, such as leaks or explosions.
As defined by Collins Dictionary, a pressure gauge is “An instrument for measuring the pressure of gases or liquids, consisting of a semicircular or coiled, flexible metal tube attached to a gauge that records the degree to which the tube is straightened by the pressure of the gas or liquid inside.”
A Brief History of the Pressure Gauge
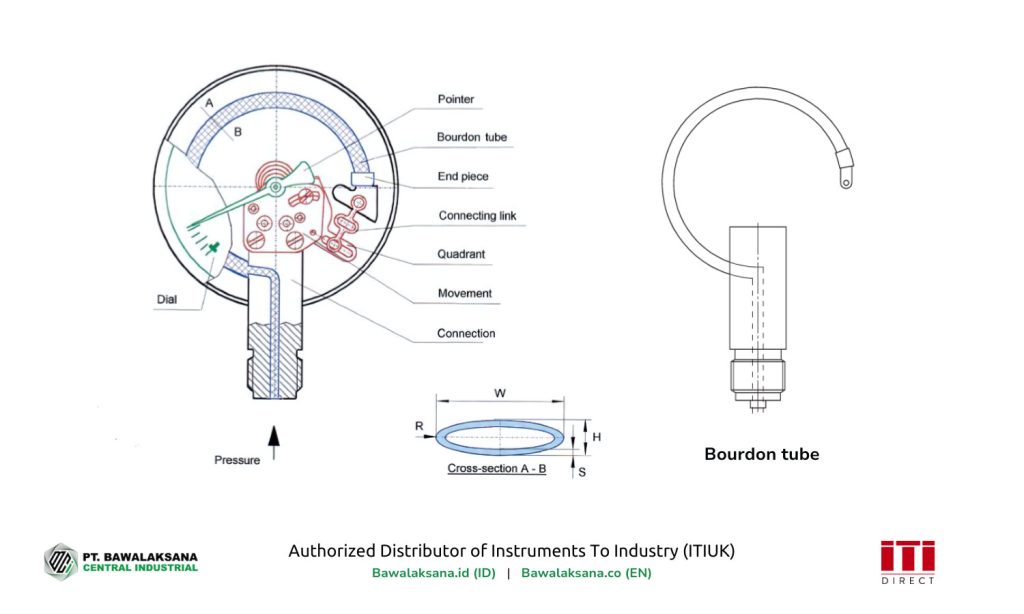
In 1849, the French engineer Eugène Bourdon patented a pressure-measuring device characterized by a hollow, C-shaped tube, now referred to as the Bourdon tube. This tube is a long, circular, C-shaped structure housed within the pressure gauge.
When measuring the pressure of a fluid—whether gas or liquid—the fluid enters the Bourdon tube.
The pressure exerted by the fluid induces a deflection in the tube, leading to an increase in the diameter of its “C” shape in direct proportion to the fluid pressure.
At the terminal end of the tube, a linkage mechanism composed of various mechanical components, such as hooks and pivots, translates this deflection into the observable movement of the pointer on the gauge’s dial face. Consequently, the pointer indicates the fluid pressure according to the range displayed on the gauge window.
Notably, the Bourdon tube continues to be the most widely utilized component in mechanical pressure gauges today.
Despite its invention in 1849, Bourdon tube pressure gauges’ enduring popularity can be attributed to their simplicity and reliable performance. A significant advantage of Bourdon tube pressure gauges is their independence from external power sources, allowing them to achieve measurement accuracy of up to 0.1% of full-scale deflection.
Key Components of a Pressure Gauge
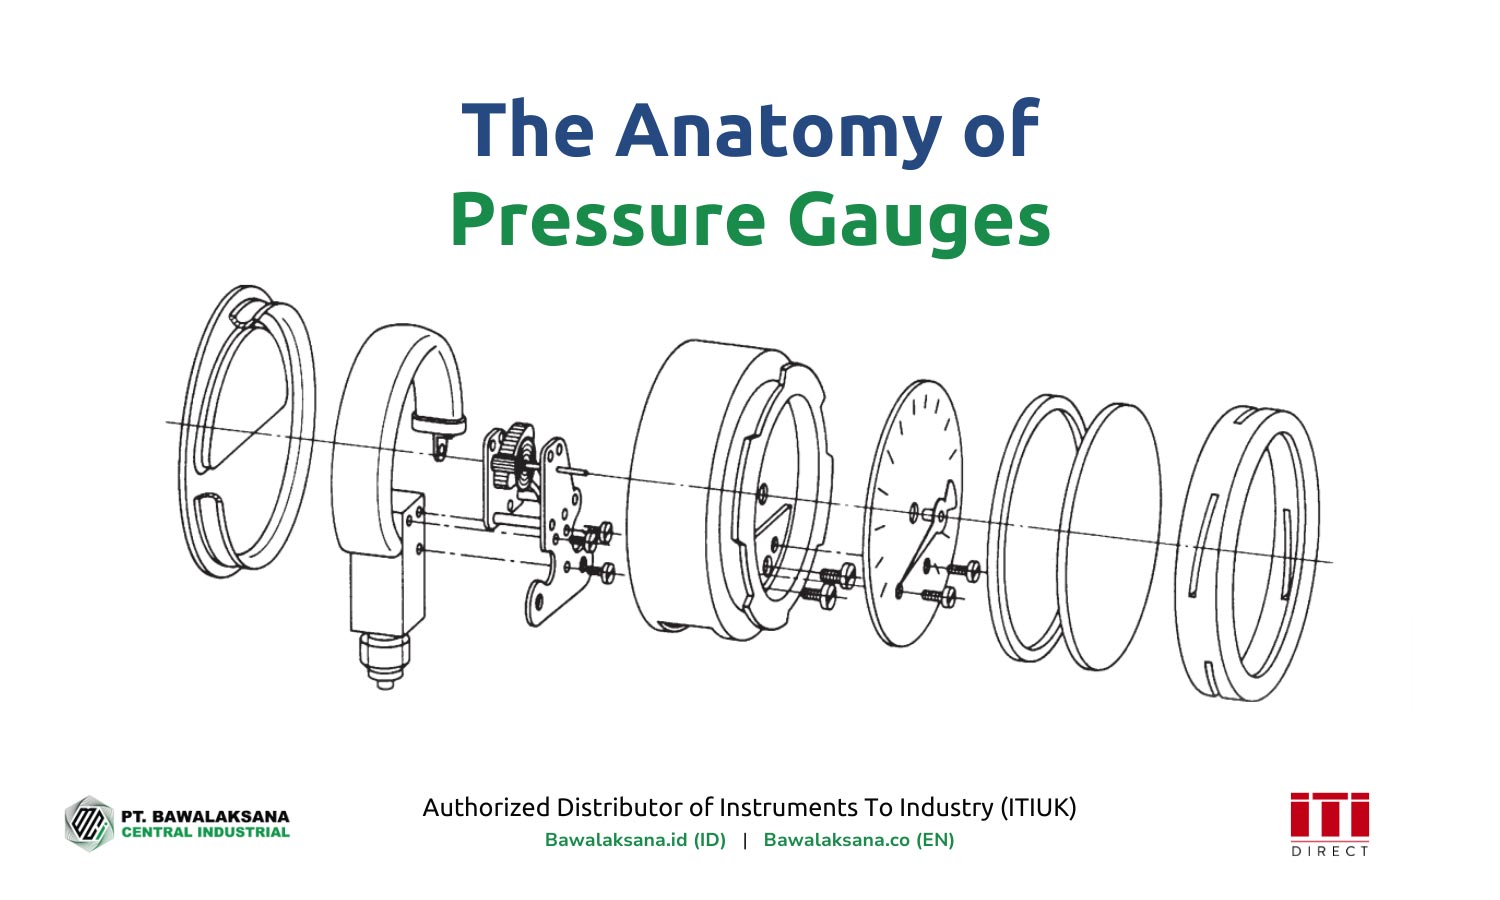
Pressure gauges are complex devices comprised of numerous essential components that function in unison. The following outlines the primary elements of a Bourdon tube pressure gauge:
- Bourdon Tube: The Bourdon tube is a hollow, C-shaped structure that acts as the sensing element in a pressure gauge. When pressurized fluid enters the tube, it attempts to straighten due to the pressure exerted on its walls. This deflection is transferred through a linkage mechanism, which causes the pointer on the dial face to move, displaying the corresponding pressure value.
- Casing: Many industrial-grade gauges are constructed with stainless steel (304 or 316) to ensure durability; however, other materials such as carbon steel, plastic, or brass may also be utilized.
- Connector or Socket (Inlet): This component is the first point of contact between the gauge and the pressurized fluid. High-quality gauges feature threaded connectors that facilitate attachment to various gauge accessories. Typically, the material used is stainless steel 316 or brass.
- Pointer: The pointer is mechanically linked to the end of the Bourdon tube. As the tube deflects, the pointer is displaced and moves in a circular path within the dial or gauge window.
- Dial Face: The dial face displays a scale that varies from 0-10 mBAR to 0-1,600 BAR, depending on the specific type of gauge. The scale is calibrated to correspond with the deflection of the Bourdon tube. Additionally, the dial often incorporates the name and logo of the pressure gauge’s manufacturer or vendor.
Further elaboration on the components outlined above will be provided in subsequent sections.
Types of Pressure Gauges
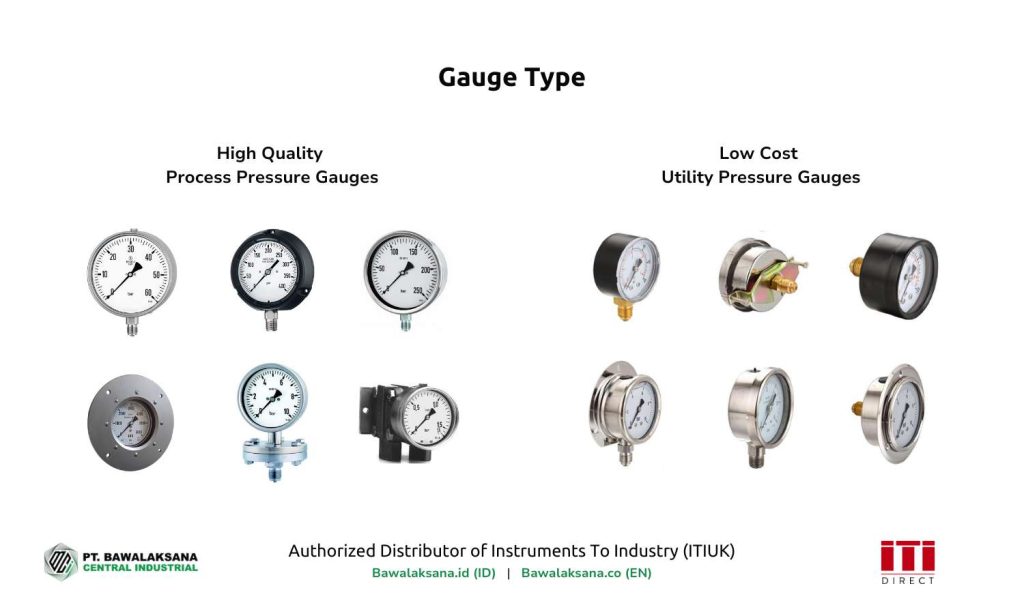
Given the extensive variety of pressure gauges available in the current market, these instruments can be categorized in multiple ways. However, they may be broadly classified into two primary categories:
- High-Quality Process Pressure Gauges: These industrial-grade pressure gauges are highly accurate and are extensively utilized in critical sectors, including general industry, food and beverage (F&B), petrochemicals, pharmaceuticals, transportation, subsea or offshore applications, and the oil and gas industry.
- Low-Cost Utility Pressure Gauges: These gauges are employed in everyday applications, such as air compressors, tire pumps, small pressurized tanks, and pneumatic, hydraulic, or general industrial systems.
The first category, High-Quality Process Pressure Gauges, includes various types and variations. This segment is highly competitive, with numerous global manufacturers striving to produce high-quality instruments with exceptional accuracy, rigorous standards, and critical safety features tailored for industrial applications.
In our article 9 Types of Industrial Pressure Gauges and Specifications, we examined several pressure gauge types from both categories.
The subsequent section will explore the anatomy of pressure gauges, focusing on their materials and design specifications, starting with the gauge case and bezel.
Gauge Case and Bezel
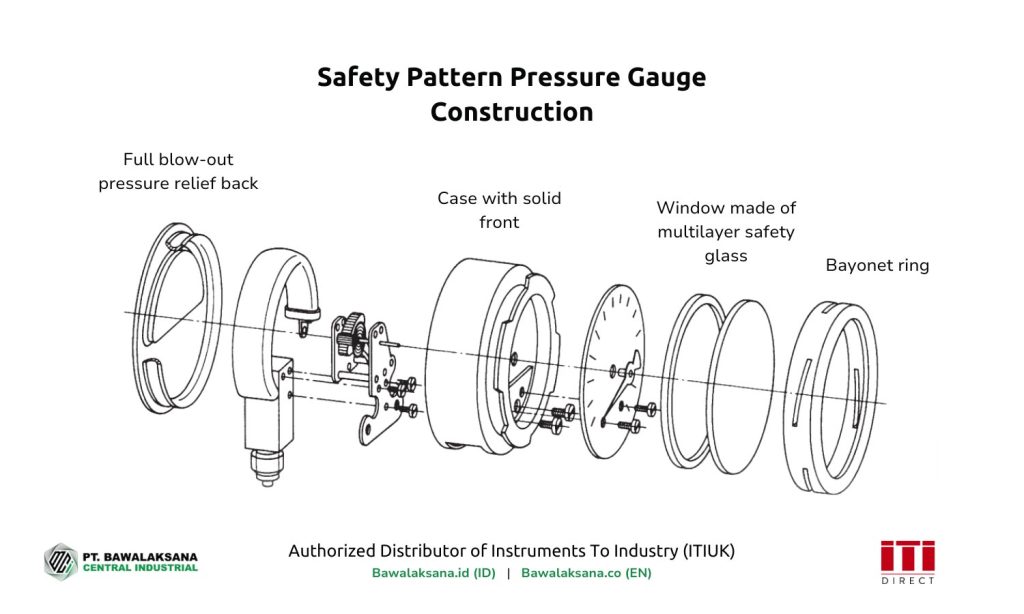
The gauge case constitutes the primary casing or body of a pressure gauge, while the bezel serves as the ring or retainer that secures the gauge’s lens or window, typically composed of glass or tempered glass.
Pressure gauges are available with two distinct types of bezels:
- Removable Bezels (bayonet)
- Non-Removable Bezels (crimped)
The primary advantage of selecting a bayonet bezel lies in its capacity for future maintenance or cleaning of the pressure gauge.
Furthermore, a bayonet bezel facilitates the filling of the gauge with glycerin or silicone oil, thereby enhancing the longevity of its components and providing protection against potential damage.
The materials utilized for pressure gauge cases and bezels in industrial applications frequently include:
- Stainless Steel 304
- Stainless Steel 316L
- Carbon Steel
- ABS Plastic and Thermoplastics
In critical industrial applications, pressure gauge cases are predominantly constructed from Stainless Steel 304, while sockets (connectors) are typically made from Stainless Steel 316 or brass.
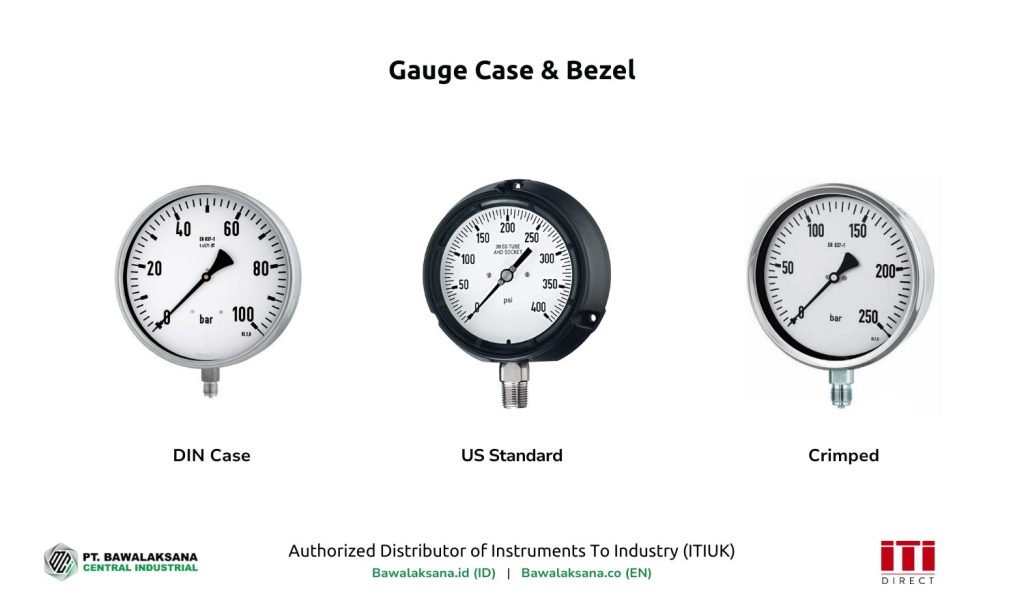
Currently, three primary types of gauge cases are available for consideration:
- DIN Case: Constructed from Stainless Steel 304 with a removable bayonet bezel, this type permits easy cleaning and maintenance and may be filled with glycerin or silicone oil.
- Crimped Case: Fabricated from Stainless Steel 304, this variant features a non-removable crimped bezel. It presents a more economical option but does not allow for bezel removal for maintenance.
- US Standard Case: This case exhibits a unique design that differs from DIN and Crimped cases. It is made from high-quality thermoplastic or stainless steel and may also be filled with silicone oil or other suitable fillings.
The most appropriate case type for industrial pressure gauges depends on the application’s specific needs and requirements.
Each type of pressure gauge adheres to its own standards and operational criteria, making it essential to select a gauge that meets operational conditions.
In a prior article, the various types of pressure gauges, including their example applications and specifications, were discussed in depth.
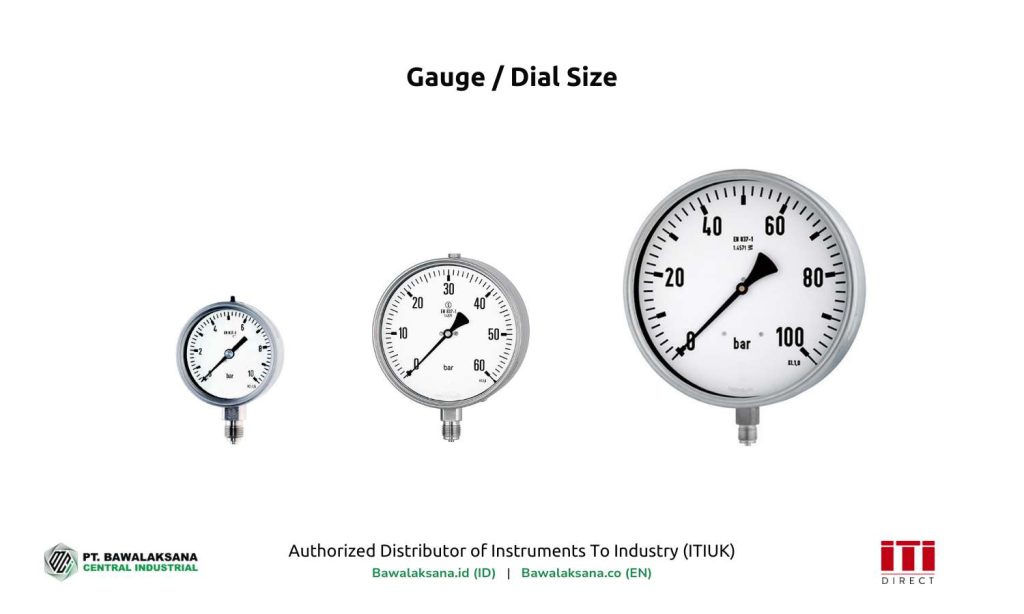
Gauge / Dial Size
The term “dial size” refers to the diameter of a pressure gauge’s face, with manufacturers typically offering a diverse range of size options. For process pressure gauges, the most commonly utilized sizes are as follows:
- 40mm (1½ inch)
- 50mm (2 inch)
- 63mm (2½ inch)
- 100mm (4 inch)
- 150mm / 160mm (6 inch)
- 250mm (10 inch)
How to Determine the Ideal Dial Size for a Pressure Gauge?
The ideal dial size depends on the specific requirements of a given industrial application. As a general guideline, selecting a size that facilitates clear and convenient readability of measurements from a reasonable distance upon installation of the gauge is advisable.
When precise pressure measurement is paramount, a Test Pressure Gauge with a larger dial and superior accuracy should be utilized.
Test Pressure Gauges typically feature finely detailed lines in the dial face and are classified according to high accuracy levels, such as Class 0.25, Class 0.6, or Class 1.0.
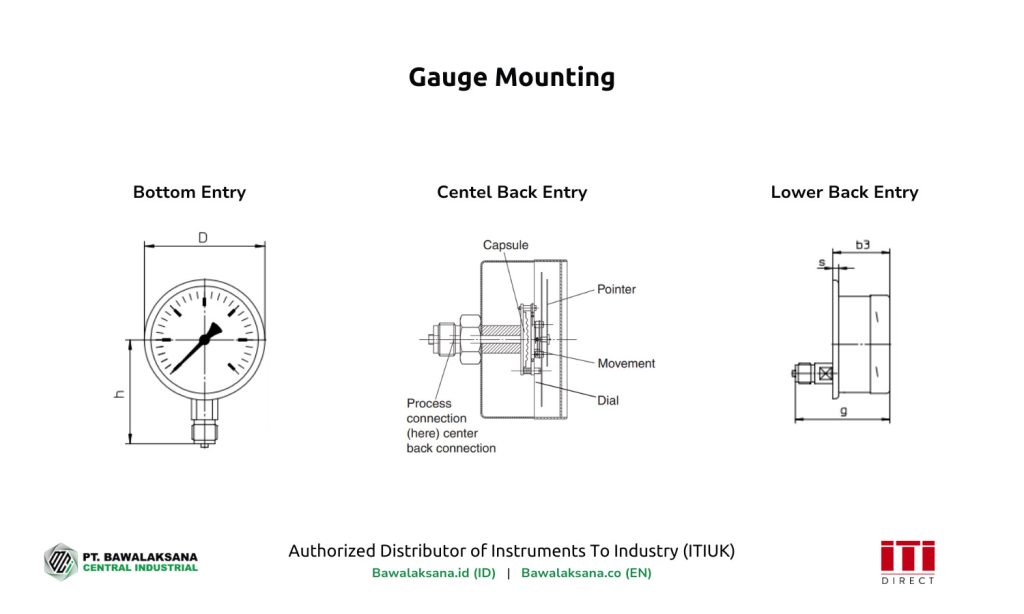
Gauge Mounting
Gauge mounting refers to the method utilized for attaching a pressure gauge to a pipeline, which is determined by the location of the socket (inlet connection). Mounting may be conducted directly, via a flange, or through clamp fixing methods, such as those employed for Rail Pressure Gauges.
The majority of pressure gauges are equipped with three standard mounting and connector positions:
- Bottom Entry
- Center Back Entry
- Lower Back Entry
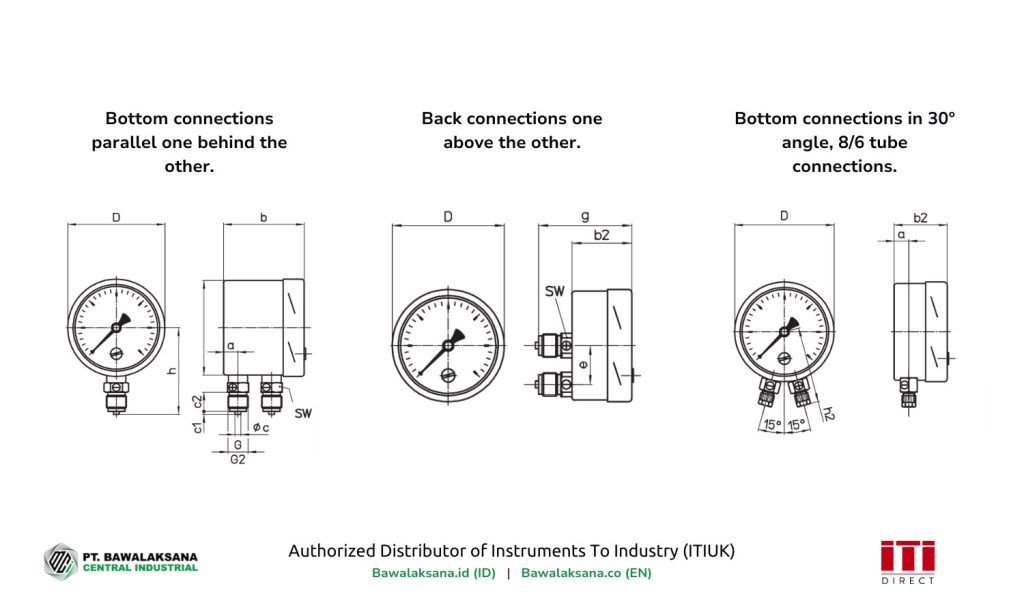
While mounting can occur at the back, center, or bottom of the gauge, it is crucial to ensure it is installed upright. This practice guarantees minimal interference with the Bourdon tube and maintains the gauge’s internal mechanical components’ optimal performance.
Gauge Connection / Threads
The connection or threads must correspond to the appropriate type to achieve optimal functionality from a pressure gauge. This correspondence ensures a secure and tight fit, thereby preventing fluid leakage that could adversely affect the accuracy of pressure measurements.
Presently, there are three principal types of gauge connections:
- NPT (National Pipe Thread)
- BSPP (British Standard Pipe Parallel)
- BSPT (British Standard Pipe Tapered)
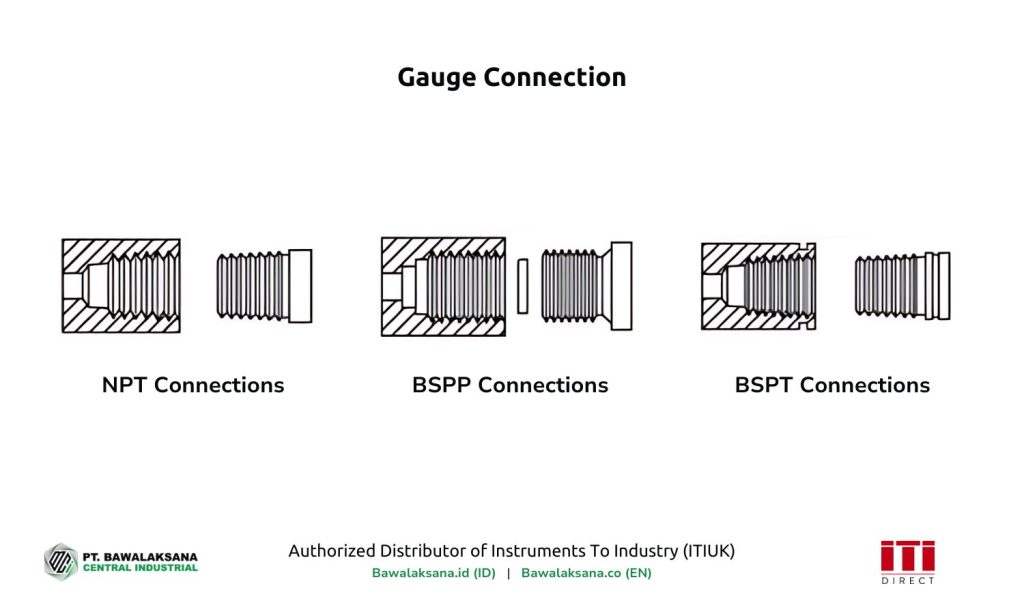
Each thread type has its advantages in accommodating the needs of various industrial applications. Below is a comparison table for NPT, BSPP, and BSPT gauge connections:
| Gauge Connection | NPT | BSPP | BSPT |
| Usage (Country/Region) | Primarily used in the USA and Canada. | It is commonly used in the UK, Europe, Asia, Australia, New Zealand, and South Africa. | Primarily used in China and Japan. |
| Sealing Method | Male and female threads require a thread sealant or Teflon tape for a tight seal. | Male and female threads require a sealing ring (ring seal) or copper washer to prevent leaks. | Male and female threads require a thread sealant or Teflon tape for a tight seal. |
| Advantages | BSPP threads are best for hydraulic systems and applications requiring frequent and quick disassembly. They can be reused without damaging the seal. | BSPP threads are best for hydraulic systems and applications requiring frequent and quick disassembly. They can be reused without damaging the seal. | Excellent for high-pressure applications. Offers versatility for various industrial settings. |
| Thread Type | Slightly tapered threads. | Parallel threads. | It is ideal for high-pressure applications. It is designed with durable materials suitable for extreme environments such as the oil and gas industry. |
Key Points to Consider
Selecting the correct connection type is essential for maintaining system integrity and ensuring seamless operation. This choice should align with the specific industrial requirements and regional standards to ensure compatibility.
Connecting mismatched thread types may lead to leakage and damage to the gauge threads, even if the threads appear similar. For example, connecting an NPT female fitting to a BSPT male fitting can compromise threads and materials.
Manufacturers typically provide various thread sizes. Based on our experience, the following sizes are commonly available:
NPT Thread Sizes:
- 1/8 inch
- 1/4 inch
- 1/2 inch
BSPP and BSPT Thread Sizes:
- 1/8 inch
- 1/4 inch
- 3/8 inch
- 1/2 inch
Each thread type possesses distinct advantages and specific applications. The materials utilized for threads are frequently stainless steel or brass, determined by the application requirements.
Which Gauge Thread Type is Most Suitable?
The ideal choice depends on your specific needs and regional standards. For expert recommendations tailored to your industrial applications, please consult the knowledgeable team at Bawalaksana Central Industrial.
Gauge Material
The gauge material predominantly pertains to the substance utilized for the Bourdon tube, a hollow C-shaped tube situated within a pressure gauge.
The Bourdon tube directly interacts with the fluid when assessing fluid pressure in a conduit. If the tube’s material is incompatible with the specific type of fluid being measured, the likelihood of the tube breaking or failing escalates significantly.
This scenario poses considerable risks to both industrial infrastructure and personnel safety.
However, when pressure gauges are complemented with diaphragm seals, the Bourdon tube remains isolated from direct contact with the fluid, enhancing its durability and prolonging its functional lifespan.
Common materials employed for Bourdon tubes include:
- 316L Stainless Steel with a socket also constructed from 316L stainless steel, appropriate for applications involving temperatures up to 200°C (392°F).
- Phosphor Bronze with a brass socket is suitable for applications up to 80°C (176°F).
Recommendation
In instances where the Bourdon tube material is incompatible with the fluid’s characteristics (for example, aggressive, dense, or prone to crystallization), it is advisable to utilize Diaphragm Seals for enhanced protection.
Implementing diaphragm seals assures the gauge’s performance and longevity and mitigates the risk of blockages or ruptures resulting from excessive pressure.

Gauge Ranges
Gauge ranges delineate the maximum pressure limits a pressure gauge can measure.
When selecting a pressure gauge, it is crucial to ensure that the operational pressure of your industrial process does not exceed 75% of the gauge’s maximum measurement capacity.
It would be best to choose a gauge range where the operational pressure is located within the central portion of the scale range.
Example
If your operational pressure is around 50 BAR, choosing a pressure gauge with a scale range of 0 to 100 BAR is advisable.
Pressure gauge manufacturers support this recommendation, which helps prevent damage from sudden pressure spikes and ensures accurate readings.
The following table shows the pressure ranges commonly available for gauges in the market:
| Gauge Ranges | |
| 0 to 15 Psi | 0 to 1 BAR |
| 0 to 30 Psi | 0 to 1.6 BAR |
| 0 to 60 Psi | 0 to 2.5 BAR |
| 0 to 100 Psi | 0 to 4 BAR |
| 0 to 160 Psi | 0 to 6 BAR |
| 0 to 200 Psi | 0 to 10 BAR |
| 0 to 300 Psi | 0 to 16 BAR |
| 0 to 400 Psi | 0 to 25 BAR |
| 0 to 600 Psi | 0 to 40 BAR |
| 0 to 1000 Psi | 0 to 60 BAR |
| 0 to 1500 Psi | 0 to 100 BAR |
Note:
The dial face of a pressure gauge can display two pressure units, such as Psi and BAR or BAR and Psi. Other available units include Pa, kPa, MPa, kg/cm², and more.
Gauge Filling
Obtaining accurate pressure readings can be challenging in demanding industrial environments, such as oil and gas extraction, offshore operations, or areas subject to heavy vibrations. Excessive vibrations may cause the gauge pointer to oscillate, making it difficult for operators to interpret measurements correctly.
To mitigate this issue, gauges can be filled with specific liquids, such as:
- Glycerin
- Silicone Oil
- Openol (suitable for gauges with electrical contacts)
Liquid-filled gauges help stabilize the pointer during vibration, ensuring more accurate readings. This filling also protects the internal components, enhancing their durability and resistance to damage.
For extreme industrial conditions, filling pressure gauges with glycerin or silicone oil improves readability and extends the instrument’s lifespan, ensuring reliable performance over time.
Gauge Lens / Window
The material used for the glass or lens of a pressure gauge varies according to industrial requirements. Manufacturers select different materials based on the specific application intended, which includes:
- Glass (designed explicitly for instrumentation purposes)
- Safety Glass / Tempered Glass
- Polycarbonate
- Acrylic
The lens’s material affects both the price and quality of the gauge.
For pressure gauges with Safety Pattern S3 Grade, the lens is made from Multilayer Safety Glass, which is robust and durable.
Why must the gauge lens be solid?
The primary purpose of a solid gauge lens is to prevent it from shattering into fragments in the event of a Bourdon tube rupture. It ensures the safety of nearby operators, protecting them from injuries or exposure to hazardous, high-temperature, or toxic fluids.
Gauge Accuracy
Every pressure gauge must comply with internationally recognized accuracy standards, such as EN837 Class 0.25, EN837 Class 0.6, and EN837 Class 1.0.
It is important to note that the smaller the class value, the greater the accuracy of the measurement.
For example:
- EN837 Class 1.0 means the maximum allowable error is ±1% of the pressure range.
- Class 1.6 allows a maximum error of ±1.6% of the pressure range.
What is the EN837 Standard?
According to GlobalSpec, the EN837 Standard is a European standard established for the accuracy of pressure gauges, including the Bourdon tube, vacuum, and compound gauges. This standard applies to industrial gauges for measuring liquids, high-pressure gases, oxygen, or acetylene.
Since pressure gauges are instruments susceptible to mechanical wear and tear, deviations from actual values can occur. Such deviations highlight the necessity of the EN837 Standard, which articulates accuracy as a percentage of the full-scale dial range. This standard is essential for calibration, ensuring deviations do not exceed the prescribed accuracy class.
Dial Size and Accuracy Class
The following table correlates dial size with the achievable accuracy class in accordance with BS EN 837-1:
| Dial Size (mm) | Accuracy Class (European Standard) | ||||||
| 0.1 | 0.25 | 0.5 | 1.0 | 1.6 | 2.5 | 4 | |
| 40 / 50 | ✔ | ✔ | ✔ | ||||
| 63 | ✔ | ✔ | ✔ | ✔ | |||
| 80 | ✔ | ✔ | ✔ | ✔ | |||
| 100 | ✔ | ✔ | ✔ | ✔ | |||
| 100 / 150 | ✔ | ✔ | ✔ | ✔ | |||
| 250 | ✔ | ✔ | ✔ | ✔ | ✔ | ||
The table shows that larger dial sizes offer better accuracy, supported by the quality and precision of components considered during manufacturing.
How to Identify a Pressure Gauge’s Accuracy Class?
The accuracy class is printed on the dial face, typically on the right-hand side or center. It is often indicated by:
- Acc
- Class
- Cl or Kl (e.g., Cl 1.0, indicating 1% of the full-scale range).
Key Considerations for Accuracy
Even the highest-quality pressure gauges experience accuracy changes over time. Regular calibration is essential to ensure continued reliability.
It’s also important to note that gauges left unused for extended periods may lose calibration due to mechanical wear or temperature fluctuations, even without active usage.
For further information, see our detailed article: Critical Facts About Pressure Gauge Calibration You Need to Know.
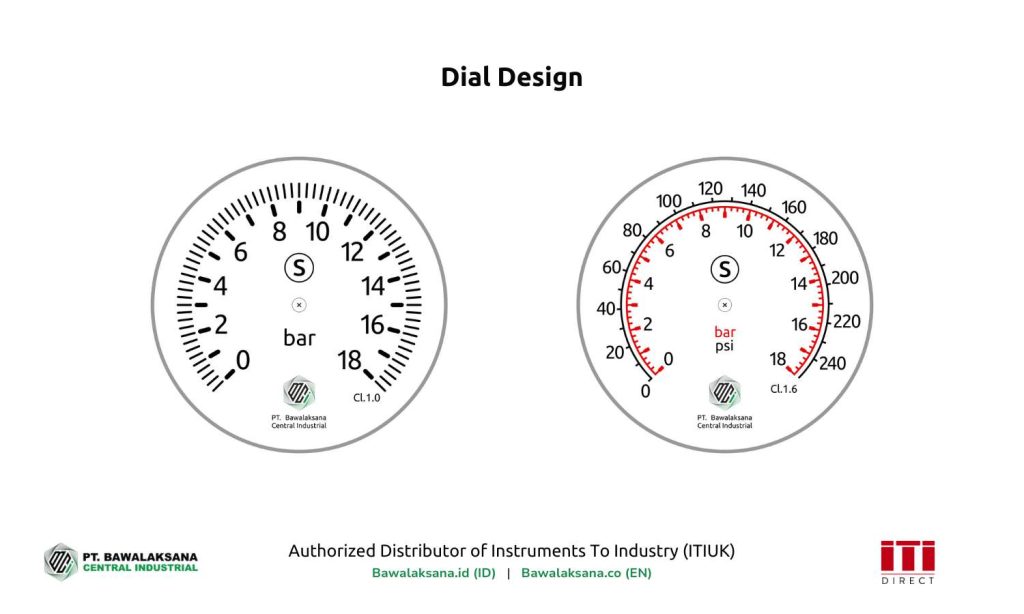
Dial Design
The final component of a pressure gauge’s fundamental anatomy is the dial design, which encompasses the dial face displaying the pointer and measurement numerals.
It is essential to recognize that dial design transcends mere aesthetics or a platform for the vendor’s branding; it fulfills several critical functions:
- Aesthetics and Ergonomics: While the design contributes to the gauge’s visual appeal, its primary objective is to enhance the user’s readability of measurement results. As such, selecting colors is vital to ensure that measurements are easily discernible.
- Accuracy Class: Pressure gauges designed for industrial applications will indicate the accuracy class on the dial face. This information allows users to understand the accuracy standards associated with the gauge.
- Full Safety Pattern: To ascertain if the gauge incorporates a Full Safety Pattern with blow-out back devices, one should look for the “S” symbol on the dial face, noting that this may vary by manufacturer.
- Precision and Calibration: Pressure gauges adhering to accuracy standards, such as EN837 Class 0.25, typically feature larger dials with closely spaced pointer markings. This design supports precise measurements necessary for calibration or comparison with process instruments.
In summary, the primary purpose of dial design is to enhance functionality while providing essential information in a singular location. Consequently, the focal point in designing a dial face should prioritize ergonomics and function over mere aesthetics or superfluous features.
Conclusion
In conclusion, this exploration has delved into the fundamental anatomy of a pressure gauge, encompassing its principal components, the materials utilized, and the considerations related to its design and casing.
A pressure gauge possesses a sophisticated structure. Variations in materials, accuracy levels, and manufacturing processes notably influence its performance, durability, and cost, even when the gauges appear similar at first glance.
A pressure gauge is not only a device for measuring fluid pressure but also an essential instrument for optimizing production efficiency, enhancing safety within industrial environments, and ensuring optimal process quality.
PT. Bawalaksana Central Industrial is the official distributor of pressure gauges from Instruments To Industry (ITI). We offer a diverse selection of highly accurate industrial-grade pressure gauges alongside various instruments for measuring pressure and temperature.
The ITI pressure gauges find applications across multiple critical industries, including:
- General Industrial
- Chemical and Petrochemical
- High Purity / Sterile Processes
- Food, Beverage, and Dairy
- Heating Installations
- Filter Systems
- Pharmaceutical
- Oil and Gas
- Shipping
- Power Generation
- And additional sectors
Please visit the ITIUK vendor page to understand our instruments thoroughly.
Our dedicated team is ready to provide expert support and can help you choose the right instrumentation for your industry. We strongly recommend consulting with our engineering specialists to get tailored advice for your needs.

Romanta Pinrih Linuwih
Pneumatic Automation Systems Expert
This article was written in collaboration with Romanta Pinrih Linuwih, an expert in Pneumatic Automation Systems, to ensure accuracy and high quality insights.




![10+ Examples of Pneumatic Tools in Daily Life and Industry [2025]](https://bawalaksana.co/wp-content/uploads/2025/05/Sandblasting-large-diameter-pipes-to-remove-surface-contaminants-1080x675.jpg)
